Showing posts with label Recipes. Show all posts

Tuesday, 17 July 2012

Holy guacamole

DSC00779

There is, quite literally, no end to my talents. First of all, I queued up the other day for a takeaway coffee with my top hanging open too low and my bra popping out. The cashier was too mortified to say anything and I discovered my wardrobe malfunction later on, after I’d spent 30 minutes pushing my trolley round a busy supermarket. An hour or so later, in a fit of recklessness (I get my thrills where I can these days) I thought I’d park the car in our too-narrow driveway. Why? I had never done this before, I always park on the road because the entrance to our drive is just too narrow, and there is a lamppost RIGHT THERE getting in the way…but anyway, the weather was tempestuous and I had tonnes of shopping and a baby to get out of the car and into the house. This resulted in me crashing slowly, but determinedly into the neighbour’s adjoining wall, causing it to cave in slightly, scratching all the paint off one side of the car, denting it in various places and busting the headlamp. Then I burnt dinner.

So, anyway, on that note, I thought I’d give out a relatively foolproof recipe for guacamole, continuing this month’s Mexican theme. Perfect for eating sitting indoors looking out at the endless rain lashing into our gardens, day in and day out. Viva the British summer. I just can’t wait for more rain. And some more. And then some more. It’s making me insane. I want to go out and hairdry the garden – it’s waterlogged. I long to take the so-called jetstream, juddering about in the wrong place above Northern Europe, and give it a good swearing-to.

This recipe will feed around four as a dip, with everyone getting plenty.

You will need:

2 perfectly ripe medium avocados
juice of 1/2 lime
A few fresh coriander stalks, about 10, roughly chopped
1 big handful fresh coriander stalks and leaves, chopped up fine
1/2 tsp habanero chile powder, or 1 fresh birdseye chilli, chopped fine
1 large ripe tomato (or handful of cherry toms) diced
1 clove garlic
Salt to taste

Optional: 1 tsp ground coriander and 1/2 tsp ground cumin (extra nice if you toast the whole spices first, then grind up, but ready-ground is fine too)
You can also substitute the chopped tomatoes for pomegranate seeds or diced red grapes if you fancy something a bit different

To serve – salted tortilla chips

Pound the garlic clove and coriander stalks together with a pinch of salt in a pestle and mortar till crushed up, then add your avocado and pound all this together. If your avocado is a tad on the unripe side, you can cheat and use a stick blender to whiz it all up if it won’t mash well. (But to be honest unripe avos will taste a little bitter). Add the chilli, then the lime juice and mix together, and then add the spices if you are using them. Add the chopped tomatoes and chopped coriander, mix together and taste. Add more salt if you think you need it. Remember your tortilla chips that you dip in will be very salty, so don’t overdo it.

You might have noticed that I don’t add raw onion to my guacamole – this is because I absolutely HATE raw onion in any form and find it too overpowering. Yuk! You really don’t need it, the garlic, chilli and spices are enough to give lots of flavour.

DSC00780

Wednesday, 6 July 2011

Gazpacho soup, two ways

Oof – this hot weather in London has been lovely. And I have craved cold soups like nobody’s business, because the thought of heating up the oven or stove has been too much in the muggy heat. I have always been a bit obsessed with the Spanish cold soup, gazpacho, and thought I’d include two recipes below – one using the traditional tomato as its base, and the other made with roasted beetroot.

Beetroot Gazpacho Soup

DSC00299

This is quite a different style of gazpacho which tastes earthy and sweet from the beetroot, and is delicious garnished with a dollop of minty yoghurt. A great use of beetroot, which I often struggle to use up…

Serves 6 as a generous starter

You will need:

10 medium beetroots
Half a medium red onion
1 large clove garlic, minced
1 green chilli
1 large handful flatleaf parsley
1 large cucumber, peeled
10 tablespoons red wine vinegar
3 tablespoons extra virgin olive oil
Salt and pepper to taste
Handful of fresh mint, finely chopped
5 tablespoons thick plain Greek yoghurt (such as Total)

Peel the beetroots, chop into small chunks and spread out into one thin layer in an oven dish. Toss them in oil and a bit of salt, then tightly cover the dish with aluminium foil and roast in an oven for 1 to 1.5 hours at 200C, or until tender and you can pierce easily with a knife. Set aside the beetroot to cool down completely.

Take a large mixing bowl, chop all the remaining vegetables up into chunks, roughly chop the flatleaf parsley and chuck everything into the bowl. Add the vinegar and oil, then pulverise to a puree with a hand/stick blender – add some water if you need to loosen up the texture. The resulting mixture should be quite thick. Season to taste and chill in the fridge overnight, then just before eating, remove from the fridge, season to taste again (add a bit more vinegar if you like) and put into bowls. Finely chop the mint, mix into the Greek yoghurt, and add a dollop of the herby mixture on top of the soup. Really nice served with some grilled halloumi cheese and toasted rustic bread slathered in olive oil – the sweetness of the beetroot and the saltiness of the cheese is amazing.

Tomato Gazpacho Soup

A great starter to kick off a barbecue or any meal eaten outdoors. Dedicated to Ali and Pippa – you can stop hassling me for the recipe now! ;o)

(Sorry, no photo for this – we ate it too quickly…)

Serves 6 as a generous starter

You will need:

6 large ripe red tomatoes
1 medium green pepper
1 medium red pepper
1 large cucumber, peeled
2 cloves of garlic, minced
Half a medium red onion
2 green chillies (I like the soup to have a bit of a kick)
A couple of slices from a stale white sourdough loaf
Extra virgin olive oil, about 10 tablespoons
600ml water
Red wine vinegar, about 6 tablespoons, or sherry vinegar if you’re feeling posh
Salt and pepper to taste

Take a large mixing bowl. Chop all the vegetables up into dice. Chuck them into the bowl, add the oil, and add 3 tablespoons of the vinegar, then add half the water. Take a hand blender (stick blender) and plunge it into the veg – whiz everything up into a thick soup, which you want to remain a little rough in texture – it’s nice as a rustic soup. Keep adding water as you go, depending on how watery some of the veg are, you might not need all 600ml. Taste – add the remaining 3 tablespoons of vinegar if you want it to be a bit zingier. Season to taste with salt and pepper. Chill overnight in the fridge – this allows all the flavours to develop. The next day, just before serving, remove it from the fridge and taste it – if it needs a bit more vinegar or seasoning, add it in now. Serve chilled and enjoy – just don’t breathe on anyone immediately afterwards unless they have been eating the same soup too, it’s pretty ‘phwoar’ garlicky!

Tuesday, 22 March 2011

Lemon curd cheesecake

IMG_7056

I used to work as a freelancer on various food magazines – when I was allowed to write something, I loved it. But most of the time I did sub-editing and proofreading of recipes and supplement sections – it could be the most toe-curlingly-dull work ever. Not least because everyone typically ignores the freelancer, stuck at the crappy corner desk, as though they are some kind of alien species. But one benefit of my time on these magazines was that it made me super-anal about recipe quantities. I get so irate when cookbooks and mags don’t get their quantities right. It’s easily done, though – we’re all human.

I often find that Nigel Slater’s recipes in the Observer have mistakes in them. I know too well how that must happen – the recipes get sub-edited down to death to fit a tiny space. Many was the time I was driven around the bend by the same problem – trying to make 250 words fit a 50 word space – argh! I probably did exactly the same thing 1000 times over during my years at Delicious or Waitrose Food Illustrated magazines. And probably do it all the time on this blog. Oh well!

Anyway, since the news is unrelentingly depressing at the moment, I thought I’d put up a nice cheesecake recipe to cheer everyone up. I love cheesecake, and recently have been craving lemony tangy flavours. This one is based on two recipes by Nigel Slater, which I’ve tweaked around a bit. It’s a bit bloody good.

Serves 8 – 10 people who don’t count calories

You will need:

Lemon curd topping

Zest and juice of 4 unwaxed lemons
150g sugar
100g butter cut into cubes
3 organic eggs and 1 egg yolk

Cheesecake


Biscuit base:
90g butter
350g digestive biscuits (or a mixture of 200g shortbread and 150g oatcakes)

Filling:
1 x 284g tub double Jersey cream
100g sugar
500g full fat cream cheese (eg Philadelphia)
Scant capful of vanilla extract (use cap from bottle)

First make the lemon curd. Put the lemon zest, juice, butter and sugar into a heatproof bowl set over a simmering pan of water – make sure the bowl doesn’t touch the water. Stir from time to time until everything is melted. In a separate bowl, mix the eggs and egg yolk with a fork, then stir into the lemon mixture. Let the mixture cook over the simmering water, using a whisk to stir regularly, for between 10 and 15 minutes, until it thickens up like custard. Take off the heat and let cool down. As it cools, give it an occasional stir with the whisk. (If you can wait that long, it will keep for 2 weeks in the fridge)


Your lovely lemon curd:

 IMG_7049


IMG_7051

Now make your cheesecake base.  Line the base of a 23-cm springform tin with a disk of greaseproof paper. Blitz the biscuits to fine sandy crumbs in a food processor, then melt the butter and mix everything together in a bowl. Press the buttery biscuit crumbs into the base of the tin with your fingers, pressing hard to compact the crumbs together. Put the tin in the fridge to let the base harden for about 30 minutes.

To make the cheesecake mixture, whip the cream and sugar together until just stiff – it will take mere seconds if you use an electric whisk. Then using a spatula  (not the whisk) mix in the cream cheese and vanilla extract. Then take your cooled lemon curd and fold two thirds of it into the cheesecake mix – try not to mix it in totally as it’s nice to get a ‘ripple’ effect. Tip the mixture into the cake tin and spread flat with a spatula. Then spread the remaining lemon curd on top of the cheesecake – you want to get a nice even spread of lemony goodness. Chill in the fridge for at least 4 hours before serving with a dollop of lemon curd on the side if you have any left…

A deliciously untidy slice of lemony heaven:

IMG_7057


IMG_7058

Thursday, 24 February 2011

Parmesan, mozzarella and pomodoro bake – thanks Joanna Lumley

IMG_6847       

Last night I was gripped by a food memory that I hadn’t had since I was an angst-ridden teenager. I thought I wanted macaroni and cheese for dinner, and while I was going through the list of what I needed to buy, I suddenly recalled a recipe that my mum had made at my 18th birthday party way back in the early 90’s. It was inspired by a Joanna Lumley ad for Sainsbury’s where she coaxed the viewers, in her posh velvety tones, through making a pomodoro pasta bake with mozzarella, parmesan and tomatoes. One sighting of this ad and I was hooked!

The sight of Joanna Lumley tearing fresh basil leaves up with her glossy lacquered fingernails was mesmerising – in the late 90’s I don’t think I had even seen fresh basil outside of a jar of pesto sauce. The mozzarella I was used to was the rubbery grated stuff on top of pizzas, and parmesan came as a dried powder in a tub smelling of sick. Joanna talked through the process of adding chunks of fresh mozzarella and grated parmesan to a tomato sauce, then adding fresh basil to it and mixing with penne (penne? How exotic!) then baking in the oven, topped with more fresh parmesan. By the end of the advert, I think most of the UK was drooling. Sales of those ingredients must have soared.

I begged my Mum to make it for my 18th birthday party, which she did very graciously. I don’t think she was quite expecting that her weird daughter wanted all her friends to come to the dinner wearing drag, and since the majority of my mates were male, we had a few of bearded ladies with comedy makeup sitting around the table. Some of the boys were squeezed into ballgowns with their hairy chests poking out at the top. The few girls that came along had drawn burnt cork moustaches on themselves. (KW do you remember this?!)

Everyone arrived with bottles of cheap booze in carrier bags, which my Mum, horrified, promptly confiscated. We were allowed exactly 1 bottle of Martini Rosso on the table, shared between about 15 of us. Luckily, I managed to ‘release’ the rest of the booze from its prison and we hid it under the table, furtively topping up our glasses. It was a hilarious night. But my most abiding memory was this amazing pasta dish, courtesy of Joanna Lumley, Sainsbury’s and those trusty recipe cards given out at the checkouts – does anybody out there still have this one in an old ringbinder somewhere?

Here’s the recipe, which is entirely cooked from memory, so it won’t be accurate. Not bad recall, though, after such a massive gap of years – it tastes just how I remember it!

Serves 4 – 5 people

You will need:

300g penne shaped pasta, cooked until just underdone. I like wholewheat penne – it has a nice flavour.
2 x 400g tins plum tomatoes (use the best quality you can afford)3 tablespoons tomato puree
2 medium sized balls of fresh mozzarella, chopped into large chunks
100g + 70g fresh Parmesan cheese, grated
3 cloves garlic, crushed
1 small stem fresh rosemary, chopped
3 tablespoons fresh chopped oregano
1 large bunch fresh basil, chopped into thin slices
6 large fresh tomatoes, chopped into large chunks
Olive oil
Salt & freshly ground pepper

Preheat your oven to 180C. Oil a large baking tray. Put the chunks of fresh tomatoes in the tray and whack in the oven while you sort out the sauce and pasta.

Then make your sauce. Gently heat the crushed garlic over a medium heat in some olive oil. Add the chopped rosemary, then when everything is fragrant (but don’t burn) add the tinned tomatoes. Chop them up over the back of a wooden spoon if they’re whole ones. Add the tomato puree and oregano and simmer for about 15 minutes. Then add 100g grated Parmesan and all the chopped mozzarella. Let it melt slowly in, simmer for about 5 minutes, then season to taste with salt and pepper and add the chopped basil right at the end. Remove from the heat and set aside.

Phwoar – tomato-ey cheesy goodness!

IMG_6843

Once more with herbs – I could probably drink this like a smoothie:

IMG_6844

While you make the sauce you can get the pasta on the go. Don’t cook it through completely – it has to be a little bit hard as it’ll cook more in the oven.

When your pasta and sauce are ready, take the tray of tomatoes out of the oven. Mix everything together in the tray, then top everything with the remaining 70g of grated Parmesan. Bake until the top is crusty and golden – about 20 minutes.

Woah, it’s like food porn – look at those crunchy bits just tempting you:

IMG_6846

It’s intensely savoury, cheesy and herby with a lovely rich taste of tomato. Great for a big carbo blow-out!

IMG_6848

I was so hungry I couldn’t be bothered to make the bowl look smear-free for the camera:

IMG_6849

Does anyone else remember the Joanna Lumley Sainsbury’s ad?

Wednesday, 19 January 2011

Blood orange and grapefruit jelly

IMG_6783


Argh - why is it that jelly is such a royal pain in the arse to make? Every single recipe I've tried gives a specific number of gelatine sheets to use, and the jelly never EVER sets. The recipe I tried below (tsk tsk Nigel Slater) was no exception - it took three attempts to get it right. I thought I was going mad, effing and blinding and stomping around my kitchen in the early hours. I mean, how many flipping sheets of gelatine does one jelly need? Apparently the confusion occurs because chefs use a different size of sheet, but my gripe is that food recipe editors should realise that ordinary punters wouldn't use catering sized ones. We just buy the regular Supercook ones in the supermarket. Anyway. Rant over.

A really great fruit to make a jelly with is the blood orange. Blood oranges are in season right now. Don’t hang about, though – you can only get them for a couple of months a year, and they’re really worth snapping up. Really nice ones, I think, come from Sicily – you can get great organic ones from small growers there. In terms of flavour, blood oranges are slightly more perfumed than regular oranges; some have dark red flesh, others are a mottled mixture of red and orange, and some are just orange coloured on the inside. Part of the fun is unpeeling one to see how dark the segments are inside, then squeezing out the vivid juice. The only clue on a blood orange’s skin that the inside might be red coloured is a little red blush or mottling, otherwise they look exactly the same, albeit a bit smaller than normal oranges.

Uses? You can make a very grown up vodka and blood orange cocktail (fresh juice and voddy) and in terms of desserts I got the idea to make a posh fruit jelly for a dinner party. Jelly is such a great pud to make for a dinner party – it wibbles on the spoon, feels nostalgic, but if you make your own with fresh fruit juice, it’s very grown up!

This jelly came in very handy when I had to provide the pudding course at a mate’s dinner party (a sort of pot luck supper where everyone brings a course) because you can carry it across London on the tube in your bag and it won’t break or spill, it’ll just wobble amusingly.

Blood orange and grapefruit jelly

Based on a recipe by Nigel Slater; serves 8

You will need:

10 – 12 cardamom pods
1 litre fresh blood orange and pink grapefruit juice (it's nice to use a bit more blood orange juice than grapefruit - approx 1.5 kilos blood oranges and a couple of pink grapefruits)
Juice of half a lemon
Juice of half a lime
3 tbsp caster sugar
6 slices of peel taken from one of the blood oranges (if you use organic, you don’t have to worry about pesticides on the skin)
12 - 15 sheets of Supercook gelatine

Bash open the cardamom pods in a pestle and mortar and extract the black seeds. Juice the fruits, then put the juice of the oranges, grapefruit, lemon and lime in a stainless steel saucepan, add the cardamom seeds, sugar and the strips of orange peel. Stir until the sugar has dissolved, taste to check it's sweet enough, if not add a bit more sugar, then bring almost to the boil before turning off the heat and putting the lid on, letting the liquid cool down for about 20 minutes.

IMG_6782

   IMG_6785

Meanwhile, soak the gelatine leaves in water until floppy, then when the juice mixture has cooled down a bit (but still warm) add the gelatine to it and stir until dissolved. Pour the jelly mixture through a sieve to remove any seeds or peel, into either moulds, wine glasses or a large bowl and leave to set in the fridge overnight.

You could serve the jelly on its own, or with some nice shortbread and a blob of vanilla ice cream or double cream.

IMG_6788

Normally I would have put the jelly in individual glasses or moulds, but as I had to carry it across London, a big bowl had to do. Tastes the same, innit!

Sunday, 19 December 2010

Thai green curry with smoked tofu and aubergine

IMG_6505 

I am in the rather disconcerting position of having completely lost my sense of taste and all cravings for food after a nasty bout of winter flu. It’s the strangest sensation ever – I don’t feel hungry or want anything that tastes exciting. My palate is currently as developed as a wet piece of cardboard, and for the past week I have been living on toast and chocolate. I’m desperate for something that will rev up my palate and get it back on track. Can’t think what on earth that will be. I’m all off kilter, it’s so very weird.

Anyway, this post is to give you the recipe of the last thing I really enjoyed eating before I got this darned flu. Even though I can’t stomach anything like this at the moment, it’s the best Thai green curry paste recipe I’ve ever tasted, made by my hubby. He rather unorthodoxly doesn’t use sugar (which is the mainstay of Thai cuisine) which makes it all the better for me, as otherwise I find Thai curries a bit on the oversweet side. This paste can be used with chicken, beef, pork, tofu, vegetables – whatever you like. It’s the perfect fodder for winter – aromatic, fiery, zesty and full of herby flavours that dance on the tongue. (Except that at the moment I can’t taste ruddy anything!!!)

Serves 4 (with rice)

You will need:

For the paste:
2 generous thumb-sized pieces fresh peeled galangal root (or use fresh ginger)
3 long stems of fresh lemongrass, outer husks discarded
1 white onion
7 fresh lime leaves, central leaf veins removed
5 cloves garlic
4 – 10 birdseye chillies (up to you how hot you make it)
1/2 tsp shrimp paste
About half a 400ml  tin of full fat coconut milk
handful of fresh coriander root (or just a few stems)
1 tsp ground coriander
lots of ground black pepper

For the rest:
1 big aubergine, chopped into 2cm pieces
1 x 225g block smoked tofu (we love Clear Spot organic smoked tofu)
1 handful dried small shrimp
Remainder of tin of coconut milk (used for the paste)
juice of 1 fresh lime
Fish sauce, to taste
Chopped coriander and Thai holy basil

When you open your tin of full fat coconut milk, scoop out a large blob of the thick white coconut gloop that is concentrated around the top of the tin and set aside. Chop all your paste ingredients roughly and blitz it all together in a food processor. If you find it’s too dry, just increase the amount of coconut milk. You’ll probably need to leave the food processor on for about 5 minutes so that you get a roughly blended paste.

Preheat a wok over a medium flame, then add the coconut gloop you reserved earlier, fry it until it gets hot and transparent, then add your paste – fry it, stirring so that it doesn’t catch, for about 10 minutes.  Add the aubergines, dried shrimps and the rest of the coconut milk and stir well; then add the wok lid. Cook until the aubergines are tender – will take about 30 minutes. Keep an eye on everything and give it a stir from time to time. Then add the tofu, cut into cubes, cook for a further 5 minutes, then add the herbs before turning the heat off. Season with fresh lime juice and fish sauce, to taste. Serve with basmati rice.

Thursday, 16 December 2010

Fergus Henderson’s Rice Pudding

IMG_6187

I love the writings of chef Fergus Henderson. I’m not really one for his experimentations with offal – even he can’t convince me that pigs eyes and cows knees are a lovely thing to eat, sorry – but my goodness can this fellow cook a sterling pud and write about it wittily. I chanced across his excellent book ‘Beyond Nose to Tail: A Kind of British Cooking Part II’ at a second hand market, and found the section on puddings captivating. Its prose made me chuckle, and I was tickled that Fergus described his puddings in mock lofty tones as ‘steadying’ and ‘gastronomically as exciting as Prince Albert’. Ha ha! This man doesn’t do low fat – we’re talking serious usage of butter and cream, so look away now if you can’t handle it…

Anyway, this is his rice pudding. The book’s version is a little more complex as he completes his with an additional custard and raisins soaked in booze, but if you need just the rice pudding part to immediately improve a glum, wintry afternoon, this will be just the thing you need. It’s rich, warm, vanilla tones will wrap you in a big generous hug. Just the thing for a Sunday afternoon when the rain is pissing down and you have no need to go outside. Bliss.

Please don’t be tempted to try low fat replacements for any of the ingredients – your rice pudding will be much worse off for it.

IMG_6186 

Rice pudding, adapted from the recipe by Fergus Henderson and Justin Piers Gellatly

Serves 6

You will need:

125g unsalted butter (I use salted, it works fine)
150g caster sugar
200g pudding rice
1.5 litres full-fat milk
300ml double cream
1 vanilla pod
a pinch of salt (don’t bother with this if you use salted butter)

Place the butter and sugar in a large, heavy-based casserole and melt over a medium heat, stirring occasionally. Bring to the boil and let it bubble, without stirring, until it turns into a golden brown caramel. Add the rice and stir to combine it with the caramel, then add the milk and the cream. Once the liquid hits the caramel, the caramel will become hard and stringy. Don’t worry; as the liquid heats up, the caramel will melt again into it and become smooth again. Slit the vanilla pod open lengthways, scrape out the seeds and add the seeds and pod to the rice, together with the pinch of salt (if using). Bring to the boil and place in an oven preheated to 160C/Gas Mark 3. Bake for 1.5 – 2 hours, until golden brown on top and thick and creamy.

Dreamy! If you need proof of Fergus’s other excellent puddings, try out this recipe for his mighty fruit crumble cake (where you can use rhubarb, damsons, apples etc).

Wednesday, 3 November 2010

Voluptuous Victoria sponge

IMG_5957

For months I had wanted to make a really big, luxurious cake - one that, if I was a lady who lunched, I would have positioned on an elegant cake stand when my friends visited for afternoon cocktails. Sadly my life is not an endless succession of tea parties, and the moments I have to enjoy a proper sit-down cake-fest are limited and few. Making a proper Victoria sponge was something I had saved up as a 'treat for the future’, when I had a few days off. Which would mean that I enjoyed every single crumb.

I used Hugh Fearnley Whittingstall’s recipe, bouffed up with extra vanilla. This produced a generous, sexy cake, its two ample vanilla scented sponges voluptuously sandwiched together with a soft pillow of whipped cream and tangy raspberry jam. Oh yes. This was a cake that whispered ‘come hither’ from across the room. It tasted like the very best of British, but with its starchy tea room undertones flung usunder in a raunchy celebration of gorgeous gluttony, cream, vanilla and tart raspberry.

Would you just look at it, flaunting itself:

IMG_5958

Can you hear it calling you?

IMG_5960

Phwoar…you naughty thing:

IMG_5959

Champing at the bit to make this? I’m actually drooling while writing…

Adapted from Hugh Fearnley Whittingstall’s recipe, found in the River Cottage Family Cookbook

To make a 20cm cake

You will need:

4 free range organic eggs
Organic butter (I always use salted – it’s just my preference)
Fairtrade caster sugar
Self-raising flour
Pinch of salt
2 tsp natural vanilla extract
A little milk, if needed
Good jam (raspberry) – about 4 tablespoons
200ml (small pot) organic whipping cream, whipped until soft peaks form, not too stiff

Set the oven to 180C. Line your 2 cake tins with baking parchment. Stand your eggs on the scales and weigh them – make a note of the total weight. Weigh out the same amount of butter, then using a handheld mixer or the back of a wooden spoon, beat it until very soft. Weigh out the same amount of sugar, and add to the butter a third at a time, blending together until the mixture becomes fluffy.

IMG_5928

Weigh out the flour, add a pinch of salt, and set aside. Break one of the eggs into the butter mixture and beat quite hard until completely blended in. Add the other eggs in the same way, one at a time. Sift in a tablespoon of the flour with the last egg – this will help stop the mixture from curdling. Add the vanilla extract. Set a sieve over the mixing bowl and tip the flour into it – shake it all gently into the bowl. Using a tablespoon, fold the flour into the mixture, taking care not to knock out all the air.

Test the consistency of the mixture – if it sticks to the back of a spoon, add a tablespoon or two of milk to ease up the mixture a little. Spoon the mixture equally into the two prepared tins, then smooth the tops with a knife. Bake in the preheated oven for 25 – 30 minutes – until a skewer comes out clean. When you take each tin out of the oven, hold it 30cm above a hard surface and drop it straight down – this will release the air bubbles in the cake, and you’ll see that on the surface some of the bubbles on the surface will have broken. Essential to stop your cake sinking in the middle.

Leave the cakes to cool then loosen and turn out onto a rack. When completely cool, turn one of the cakes upside down so that the flat surface is uppermost and place it on a serving plate. Spread the jam over it, add the whipped cream on top, then gently sit the other cake on top. Sprinkle a little caster sugar or icing sugar over the top.

You won’t be able to eat just the one slice…I think I had three in a row, then more for dinner…

IMG_5960

Heart be still!

Monday, 25 October 2010

Damsons and a crumble cake

I had never eaten a damson in my life before this year. The past month or so, I’ve made up for lost time – it’s literally been ‘damsons ahoy’ since we picked a whole bunch of these inky blue-skinned plums on our recent holiday in the Cotswolds. If ‘purple’ had a flavour, cooked damsons would be it. When raw, they taste like a regular sweet plum, but when cooked, they’re much more intense – deep and sweet, with a touch of sourness and a hint of alcoholic cough mixture hidden in the mix…

IMG_6047

Since neither my husband or I ever remember to eat jam (it’s not that we don’t like it, we just can’t be bothered, and I still have a jar of marmalade on the go from 2 years ago) we thought we’d make a whole stash of damson compote adding a dash of water and a scant scattering of sugar to the plums,  them simmering them for 10 minutes. Damsons are small plums with fiddly stones, no bigger than a large fat grape, and some people say not to bother removing the stones when you cook with them, but the idea of spitting out stones as you chomp through a crumble seems mental, so we thought we’d press the cooked plums through a sieve:

IMG_6056

IMG_6058

What you end up with is a perfect puree that is sensational stirred through thick Greek yoghurt to make a fool, or dolloped into a crumble mixture. My mate C said she’d put it on her porridge. Check the colour – it’s so rich and vivid! Definitely don’t wear your best pastel slacks or shirt when making or eating this.

I have a whole batch of compote frozen in ziploc freezer bags, and I can feel a whole bunch of crumbles and pies coming on…

One afternoon, I thought I’d make the St John’s Rhubarb Crumble Cake, but use damsons instead. It was a very relaxing process, and the ensuing cake made a lot of people smile. I mean, who wouldn’t smile at a cake with a crunchy crumble topping and a hidden fruit centre? Pure brilliant-ness.

St John’s Crumble Cake, adapted with damsons:

IMG_6165

Serve six to eight

You will need

Three handfuls of damsons
50g caster sugar
Grated zest of 1 orange

Cake mix:
125g organic salted butter
125g caster sugar
3 large organic eggs, lightly beaten
160g self-raising organic flour, sifted
50ml full-fat milk

Crumble mix:

125g plain flour
95g organic salted butter, cut into small cubes
60g Demerara sugar
30g ground almonds
30g flaked almonds

First stone the damsons. It’s fiddly but essential. Mix them with the sugars and orange zest and set aside in a bowl for 30 minutes.

For the cake mix, cream the butter and sugar together until light and fluffy. Gradually add the beaten eggs, bit by bit to prevent curdling. Then fold in the sifted flour and last of all mix in the milk. Put to one side.

For the crumble mix, put the flour and butter into a food processor, blitz until everything resembles large breadcrumbs, then briefly mix in the ground almonds, sugar and flaked almonds.

 IMG_6155

Butter a deep 20cm springform cake tin and line the base and sides with baking parchment. Spread the cake mix evenly over the base of the tin, then place the damsons on top:

IMG_6156 

Sprinkle the crumble mix over the damsons. Place in an oven preheated to 180C and bake for about 1 1/2 hours, covering the top loosely with foil if it gets too dark. The cake is ready when a skewer inserted in the centre comes out clean. Note: don’t mistake the cooked gooey Damsons for uncooked cake mixture – I nearly overdid this cake because I thought it hadn’t baked all the way through.

Serve warm, with custard or extra thick Jersey cream.

IMG_6164

IMG_6162

I ate three slices of this cake in quick succession. Easy for a greedy mare!

Sunday, 19 September 2010

Sloe vodka

IMG_5808

Ladies and gentlemen: there are wondrous berries lurking in our hedgerows right this instant that are FREE and will enable you to make wonderfully flavoured falling-over drinking booze. The above are sloeberries, which can be used to make sloe gin – or, in my case, sloe vodka, because gin makes me really argumentative, tearful and boring.

Sloes grow, I’m told, just about everywhere, from the skankiest urban wasteland to the prettiest country lanes. This is what you should be looking for: hard dark purple berries that are covered with a bluish bloom, attached to twigs that have very long large thorns. They are a bugger to pick – you might want to wear gloves, but to be honest, you can make do without as you’ll only get a few grazes.

IMG_5807

IMG_5802

Once you’ve picked as many sloes as  you can find, it’s a good idea to wash them, remove any leaves and woody bits, then shove them in the freezer for a few days. This will soften the berries up so that when you defrost them, they are easier to crush to release the purple juices and aromas.

Here’s what you’ll need:

225g sloe berries
55g Fairtrade caster sugar
50cl vodka

This will fit into a 75cl vodka bottle, with a bit of vodka left over.

Take your sloe berries out of the freezer and leave to defrost and soften. Then put your berries in a bowl and gently pound them with a rolling pin to squash them slightly. This is my mate D’s trusty time-saving trick. (Many people recommend you prick each berry individually with pin, but this is so time consuming, and you’re aiming to slightly release the juices, so the rolling pin method is very effective). Then place a funnel in the top of a clean empty vodka bottle, and push your squashed sloe berries through into it, pushing them down with a wooden spoon for ease. Then pour the sugar through the funnel, followed by the vodka, all the way to the top of the bottle. Screw the cap on tightly and shake the bottle to distribute all the sugar.

You’ll need to shake the bottle every other day or so for 3 months to ensure everything is moving around properly and the sugar is dissolved. Once the 3 months are up (and if you make this now, you’ll be just in time for drinking this at Christmas) you’ll have to strain the vodka from the berries through muslin to remove any bits, and then you can bottle it up again. The colour of sloe vodka will be a rich, vivid maroon – so pretty, and just luscious to drink chilled.

Great for cheap and original Christmas gifts – how much nicer to give someone a bottle of something homemade and harvested from hedgerows by your own fair hand? It has ‘smug’ written all over it – ha ha! 

Frozen sloes:

IMG_5864

Defrosting the sloes:

IMG_5865

Clockwise, left to right: pushing the crushed sloes through the funnel into the vodka bottle; adding the sugar; the final mixture; the beautiful coloured vodka embarking on its 3-month voyage.

 IMG_5869 IMG_5871 IMG_5876IMG_5875

Sunday, 1 August 2010

Vietnamese pork stew in clay pot


Pork stew in clay pot is one of my favourite dishes from Vietnam. It takes a few hours to simmer away on the stove top, and has really aromatic and comforting flavours - star anise, ginger and chilli all combine with caramel to create a warming and savoury mixture that is great with greens and rice. This recipe has been conjured up by my handsome hubby N. You don't need a clay pot - you can use any type of lidded casserole suitable for long, slow cooking. If you've had a rough day, this stew will make everything feel better.

The type of clay pot that we use is a Columbian Tierra Negra one:


Serves 4

You will need:

500g diced pork
1 tbsp annato seeds (optional)
2 medium onions, thinly sliced
3 tbsp palm sugar (or 3 tbsp golden caster sugar)
3 tbsp fish sauce
1 tbsp soy sauce
500 ml chicken stock
2 sticks lemongrass, bashed and cut into 3 large sections
4 medium carrots, peeled and cut into 2-inch pieces
2 whole star anise
3 cloves of garlic, sliced
2 thumbs fresh ginger, peeled and cut into thin matchsticks
2 Bird's eye or half a Scotch Bonnet chilli, finely chopped
Fresh chopped coriander to garnish


First you need to colour your oil. Put a tablespoon of annato seeds into vegetable oil over a medium heat, let them bubble for a minute or two, then remove from the heat and discard the seeds. You are left with a lovely red-coloured oil. Use this oil to cook with - brown the pork in it.

While the pork is browning, make the caramel. Heat the palm sugar (or caster sugar) in a saucepan on its own over a medium flame and wait for it to go dark brown. As soon as this happens, take it off the heat and add a tablespoon of water: be careful as it will spit. Don't stir it, it will just come together naturally to form caramel.

Add all the rest of the ingredients to the pork, add the caramel, put the pot lid on and simmer slowly on your stove top on the lowest possible heat for a minimum of two hours - any less and the meat will be tough.

The ingredients prior to slow cooking:


Srinkle with chopped coriander and serve with steamed greens and basmati rice. The finished dish:


Sunday, 25 July 2010

Perfect mayo, plus herby potato salad


For years I hated mayonnaise. Well, let me rephrase that. I actually do hate all mayonnaise that comes in a jar. It makes me heave, tasting claggy and processed, leaving a margarine-like taste in the mouth. But about a year ago this old cookbook of my mum's changed everything, after I learned how to make the Roux brothers' mayonnaise. Now I always make my own and it literally takes ten minutes of your time. It tastes like heaven, really fresh, not too eggy, and then you have the perfect foil for making a rocking potato salad.

This is the book where I got the mayo recipe, below. You can still buy it secondhand on Amazon. It's a classic - it has properly retro French dishes in it, as well as some very Eighties ones, and my mum used to make their legendary Tarte Tatin almost every week when I was a teenager:


Don't the brothers look cheerful! Nothing to do with the vin on the photoshoot, I'm sure.

Anyway, here's their recipe which is absolutely classic:

Mayonnaise, from 'At Home with the Roux Brothers'

A classic mayonnaise can be so quickly and easily made nowadays that there is no reason to buy the commercial product. And of course, if you make your own mayonnaise it can be tailored to your own taste. Firstly, you can choose the type of oil you use. For example, a groundnut oil will give a light, clear flavour, an ideal base when other flavours are to be added, as in aioli (flavoured with garlic), sauce tartare (gherkins, capers, tarragon), or sauce remoulade (similar, with the addition of anchovies). Olive oil will give a rich, robust flavour, something of an acquired taste, and mayonnaise made with olive oil is best served plain. As it is expensive to use olive oil in the quantities required for mayonnaise, try using half vegetable oil (for example groundnut, sunflower or safflower oil - not corn oil) with half olive oil, for the best of both worlds.

Again, when you make your own mayonnaise, flavourings can be as varied and as strong as you choose.

To guard against mayonnaise separating, start with everything at room temperature (especially the eggs). If it is a cold day, rinse the bowl and the whisk in hot water just before using. If at all possible, avoid storing the made mayonnaise in the refrigerator; simply keep it, covered, in a cool place. But should refrigerator storage be absolutely necessary, remove the mayonnaise about three hours before you intend to use it and leave it without stirring until it comes up to room temperature; it will then usually survive.

Mayonnaise gets very thick in the final stage, and using a wire whisk can be hard work! You may need to resort to an electric hand whisker.

Note: to prevent discolouration, never allow mayonnaise to come into contact with any metal except stainless steel.

Makes 650ml

3 egg yolks
1 tablespoon Dijon mustard
1 teaspoon salt
Freshly ground white pepper
600ml oil, of your choice
Juice of 1/2 lemon or 2 teaspoons white wine vinegar

Preparation

In a bowl, combine the egg yolks, mustard, salt and a little freshly ground white pepper. Position the bowl on a tea-towel to hold it steady as you work. Have the oil ready in a measuring jug. Start by whisking together the ingredients in the bowl. Then add the oil, a drop at a time, whisking it into the mixture. This is the critical stage: if the mayonnaise is to curdle it usually does now, so take things very slowly until about 2 tablespoons have been added. The mayonnaise will now be getting very thick and the oil can be added about 1 tablespoon at a time. When about half the oil has been added, whisk in 1 teaspoon of the lemon juice or vinegar, then continue whisking in the oil in a steady stream. When all the oil has been added, stir in the remaining lemon juice or vinegar and any flavourings, if used. Taste and season with additional salt and freshly ground white pepper, if necessary. The finished mayonnaise will be thick, wobbling mass. For a thinner sauce, stir in boiling water 1 tablespoon at a time until you reach the required consistency. Or you can stir in a tablespoon of double cream to soften the flavour.

If the mixture curdles during making or on standing, try beating in a tablespoon of boiling water. If this has no effect, simply put a fresh egg yolk in a separate bowl and gradually (just as slowly as before - or even more slowly) whisk in the curdled mix, a drop at a time.

Quite right, brothers Roux!

A few notes: I have made successful mayo of the type above using eggs cold from the fridge. I usually use grapeseed, groundnut or sunflower oil; I find that using olive oil is too bitter and rich. I have varied the types of vinegar - red wine or cider vinegar is just as good as white, and I don't even know where to buy freshly ground white pepper. I just use the pre-ground stuff from Natco. And a balloon hand whisk is the best thing to use - an electric whisk would be overkill, I think, and with a hand whisk you have total control. Not once has the recipe ever curdled, how amazing is that?!

So now you have the perfect mayonnaise recipe, you can now make a great potato salad. My version this time...


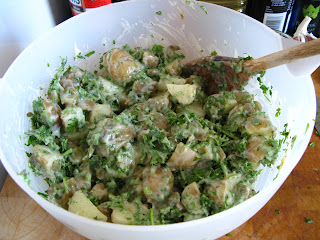
Herby potato salad

To feed a hungry horde of about 10 at a barbecue

1 x 650ml quantity of mayo, as above. Please use the freshest organic eggs you can buy!
2 kg new potatoes / Charlotte salad potatoes - no need to peel
1 jar capers in vinegar, rinsed and roughly chopped
1 handful of cornichons/gherkins in vinegar, roughly chopped
6 generous handfuls of chopped mixed fresh herbs: basil, parsley, tarragon, coriander
Juice of half a lemon (optional)

Boil your potatoes until tender. Leave aside to cool, then when they are cool enough to touch, chop them into large cubes. Let them cool down completely.

Take a big bowl, put your mayonnaise in, add your herbs, capers, cornichons and seasoning (if needed) and gently mix together. Then mix in the cold potato cubes. Taste, and if it needs a bit more sharpness, add the juice of half a lemon.

Enjoy.